
Requirements
Make Background White for Passport Photo: Rules and Methods
Make the background white for a passport photo. State Department color specs, DIY methods, and why background replacement is the hardest step.
Updated May 28, 2026
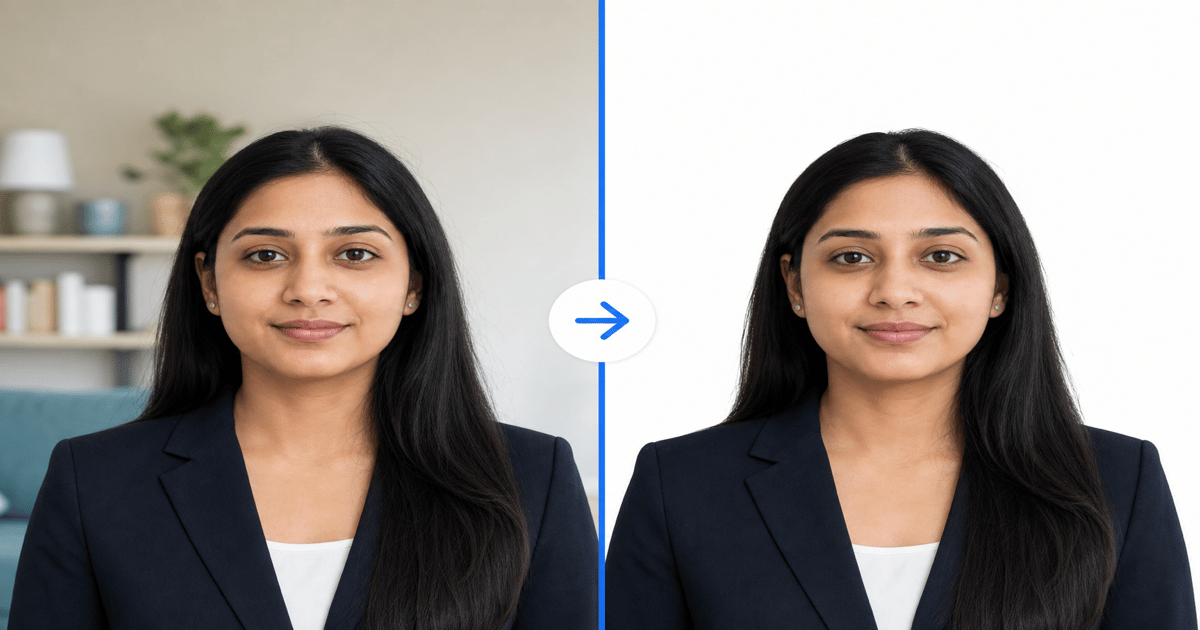
Get your compliant passport photo now
Upload any photo from your phone. We format the background, crop, and sizing to US specs — digital 2×2 file plus 4×6 print sheet in under 60 seconds.
Upload Your Photo →State Department background color requirements
U.S. passport photos require a plain white or off-white background. No patterns, textures, shadows, gradients, or visible objects. The background must be uniform across the entire frame.
Off-white means a very light neutral — not cream, not yellow, not gray. In practice, pure white (#FFFFFF) or a very light gray (#F0F0F0) passes. Blue, green, or beige walls fail.
Shadows on the background behind your head are a rejection reason. This is why photographing against a wall is harder than it looks — even a white wall shows shadows from overhead lighting.
Method 1: Shoot against a white backdrop
Hang a white bedsheet, poster board, or photography backdrop behind you. Stand 2–3 feet in front of it to reduce shadows cast on the backdrop. Light the backdrop separately if possible.
This method works but requires space and lighting control most people do not have at home. A white wall in a bathroom with bright vanity lights is a common workaround.
Even with a white backdrop, slight color casts from room lighting can make the background look gray in the final photo. Background replacement is often still needed.
Method 2: Remove and replace the background digitally
Background removal tools isolate your head and shoulders from the original background and fill the area with white. This is the method GetPassPhoto uses.
Quality varies by tool. Free removers often leave gray halos around hair, especially curly or fine hair. Examiners zoom in on these artifacts and reject the photo.
Professional-grade removal preserves hair detail at the pixel level and fills with uniform white. See our guide on turning a photo into a passport photo for the full conversion workflow.
Method 3: Manual white fill in an editor
Select the background with a magic wand or lasso tool, feather the edge 1–2 pixels, and fill with white. This works for photos with high contrast between subject and background.
Hair edges are the failure point. Manual selection leaves jagged edges or cuts into hair strands. Dark hair against a dark background is nearly impossible to select cleanly by hand.
For most people, automated background replacement produces better results than manual editing in less time.
Why background color causes more rejections than face issues
Examiners check background color before anything else. A gray, blue, or shadowed background is an instant rejection — no matter how good the face looks.
Background replacement is the core service GetPassPhoto provides. We do not smooth skin, alter facial features, or apply filters. Background and crop only — which keeps the photo within State Department guidelines on photo editing.
Upload any photo and we make the background white, crop to 2×2, and verify all other specs. 100% acceptance guarantee included.
Lighting setups that produce a naturally white background
The fastest way to make a background white for a passport photo is to control lighting before you press the shutter. Stand facing a window during daylight hours with the camera between you and the light source — never with the window behind you. Backlighting silhouettes your face and turns even a white wall dark gray in the final image. Position yourself two to three feet in front of a plain white or off-white wall, bedsheet, or poster board. Distance reduces the shadow your head casts on the surface behind you, which is one of the most common background failures examiners cite.
Overhead room lighting alone rarely produces a uniform white background. Ceiling fixtures cast downward shadows under your chin and behind your neck, creating uneven tones that read as gray or yellow on camera. Add a second light source — a lamp aimed at the wall behind you, or a reflector bouncing window light back onto the backdrop — to even out the exposure. Bathroom vanity lights on both sides of a mirror work well because they illuminate your face and the wall simultaneously. Turn off mixed-color sources like orange incandescent bulbs combined with blue daylight; mixed white balance shifts the background away from neutral white.
Even a well-lit white backdrop often needs digital cleanup. Fabric wrinkles, wall texture, and slight color casts from painted surfaces survive in the raw photo. That is normal and expected — it is why background replacement exists as a service rather than a photography failure. Take the best-lit source photo you can, then let GetPassPhoto replace the background with compliant pure white while preserving hair-edge detail. You do not need a professional studio. You need adequate light, a plain surface, and a formatting step that guarantees the exported background meets State Department specs. See our guide on making a photo 2×2 for how background and crop work together in the final file.
Common background failures at acceptance facilities
Acceptance agents see the same background problems repeatedly. Gray walls photographed under fluorescent lighting are the most frequent — the wall looks white to your eye but renders gray on camera because fluorescent tubes add a green cast. Blue or beige painted walls fail even when they appear pale in person. Busy backgrounds — bookcases, door frames, bathroom tiles, closet doors — are instant rejections regardless of color because the State Department requires a plain background with no distinguishable objects. Parents photographing infants on white blankets often fail because fabric folds create shadow lines that read as texture rather than uniform white.
Digital background edits introduce their own rejection category. Gray halos around hair — especially curly, fine, or light-colored hair — signal low-quality background removal. Examiners zoom in on the hairline and look for fringing, jagged cutouts, and patches of the original background color left between hair strands. A solid white rectangle pasted behind a poorly masked subject is worse than the original gray wall because it shows obvious manipulation without meeting the plain-background standard. Even photos taken at pharmacy counters occasionally fail when the roll-up backdrop has creases, dirt, or uneven lighting from the booth flash.
Shadows on the background are separate from shadows on the face, and both matter. A shadow cast on the wall behind your head — even on an otherwise white surface — violates the uniform-background rule. Face shadows from overhead lighting can sometimes pass if the background itself stays clean, but background shadows do not. Digital replacement removes the original background and any shadows cast on it simultaneously, which is why GetPassPhoto treats background replacement as the core formatting step rather than an optional enhancement. Upload your source photo, preview the white background result, and download a file covered by our 100% acceptance guarantee.
Clothing color affects how examiners perceive the background near your shoulders. High-contrast necklines — black shirt on white background, or white shirt on a light wall — draw attention to the shoulder line where background replacement must be clean. Solid medium-blue or gray tops photograph well against both original walls and replaced white backgrounds because the edge contrast is manageable. Avoid strapless or off-shoulder clothing that removes the natural shoulder boundary background tools use as a reference point.
Evaluating white background quality before you submit
Before you submit a passport photo with a digitally white background, inspect the edges where hair meets background. Zoom to 100% on a desktop screen — phone screens hide compression artifacts and halos that examiners see on larger monitors. Look for a clean, continuous white field behind the entire head and shoulders. Check the top of the head, ear edges, and shoulder line where clothing meets background. Any gray fringe, color spill from the original wall, or jagged pixel stair-steps along the hairline is a rejection risk. Fine hair and flyaways are the hardest areas; professional background replacement preserves strand detail instead of erasing it.
Evaluate overall background uniformity across the full frame, not just around your face. Corners and edges of a 2×2 crop must be the same white as the area directly behind your head. Some free tools whiten the center of the frame but leave the original background color visible at the edges after cropping. Others introduce a subtle vignette or gradient that looks natural on screen but fails the plain-background test. The acceptable range is pure white (#FFFFFF) to a very light neutral off-white (#F0F0F0). Cream, yellow, blue, or gray tones fail. Use our free photo checker to scan for obvious background issues before committing to a paid format.
Compare your result against the State Department's published examples on the 2026 requirements page. If your background looks noticeably darker or more textured than the official sample, assume it will fail. GetPassPhoto replaces any starting background — blue walls, outdoor scenes, car interiors, office cubicles — with compliant white, then crops to 2×2 and validates head size. We do not alter facial features, apply beauty filters, or smooth skin. Background and crop only, delivered in under 60 seconds with a digital file and optional 4×6 print sheet. If an acceptance facility or the State Department rejects the photo for background color, forward the rejection notice for a full refund under our acceptance guarantee.
If you photograph against a white backdrop and skip digital replacement, shoot in RAW or highest-quality JPEG and avoid aggressive in-camera noise reduction, which can smear fine hair edges and create muddy transitions that look like gray halos after compression. Export sRGB color space for web and print consistency. When in doubt, run the image through GetPassPhoto's free photo checker before paying for a full format — it flags obvious background uniformity problems while you still have time to retake the source photo under better lighting.
Frequently asked questions
Can the passport photo background be off-white instead of pure white?
Yes. The State Department accepts plain white or off-white. Pure white is safest. Avoid cream, yellow, or gray tones.
Will a shadow on the background get my photo rejected?
Yes. Shadows on the background are a common rejection reason. Background replacement removes both the original background and any shadows on it.
Can I use a blue background and change it to white digitally?
Yes. Digital background replacement is standard practice. GetPassPhoto replaces any background color with compliant white.
Does background replacement count as photo editing that the State Department prohibits?
The State Department warns against AI editing that alters facial features. Background replacement and cropping to spec are the product — the same service pharmacy passport photo booths provide.
GetPassPhoto services
Related guides
- Make a Photo 2×2: Passport Size Crop, Pixels, and Print Guide
Make any photo 2×2 inches for U.S. passport use. Correct aspect ratio, 600×600 pixels, head size rules, and print instructions.
- Turn a Photo Into a Passport Photo: Background, Crop, and Size
Turn any existing photo into a compliant passport photo. Background replacement, 2×2 crop, head sizing, and file export for DS-11 and DS-82.
- How to Make a Photo Passport Size: 2×2 Inches and 600×600 Pixels
Make any photo passport size — 2×2 inches, 600×600 pixels, correct head height. Specs for print and digital submission.
Get your compliant passport photo now
Upload any photo from your phone. We format the background, crop, and sizing to US specs — digital 2×2 file plus 4×6 print sheet in under 60 seconds.
Upload Your Photo →